Printable Canvas - Guide on framing canvas #Step4
Here is a step by step guide on framing canvas when using printable canvas and stretcher bars
Canvas Frame Information
The are two frames that we recommend to have in stock. There is a ‘Slimbar’ and a ‘Classic Bar.’ The only difference between them is simply the thickness of the frame. Our most popular one is the ‘Classic Bar’ and due to it being thicker it really makes your canvas pop out when displayed on a wall


Stretcher Bar Size
|
Stretcher Bars |
Size |
||||
|
Classic Bar (38mm) |
10 inch |
12 inch |
16 inch |
20 inch |
24 inch |
|
Slimbar (18mm) |
10 inch |
12 inch |
16 inch |
20 inch |
24 inch |
Alternative sizes are available, simply call 01948 804964 to discuss your requirement with our team
All bars come in boxes of 10 bars / 5 pairs. Each canvas will need 4 bars and you can mix up the sizes. For example, you could have a 10inch x 10inch canvas (needing 4 x 10inch bars)
10inch x 20 inch (needing 2 x 10inch bars and 2 x 20inch bars)
Putting your canvas frame together

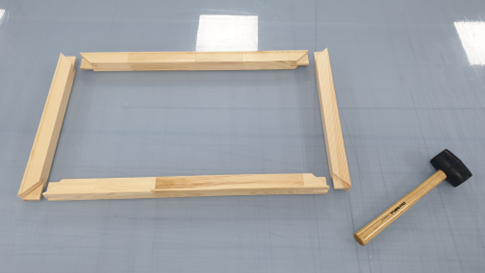
Putting your frame together is easy. Simply place your stretcher bars on the table in front of you in the formation of the size you require. The rim on the edge of the frame needs to be facing up

Join the bars together as shown in the image. Use the rubber mallet to help close the gaps in the joins. Ensure that your canvas is square and not out of shape.

Lay the canvas face down and line up the frame with the marks on the back. The example used here is a full wrap so you’re looking to make sure all the print covers the sides of the stretcher bars. If the print has a white border then make sure the same amount of print wraps around the front edge.

Use the staple gun to attached one of the edges first, followed by the opposite edge. You can use the canvas pliers to help stretch the canvas and keep the tension in the material.

Finish stapling the 2 long edges but leave the short edges with only a few staples in the middle
Canvas Corners
Gather the canvas at the edge and trim with scissors as shown in the images

Using the images shown fold in the corner starting by pushing in the corner that has no staples. Then fold over so that it lines up with the edge of the frame and finish stapling to the edge
Using scissors cut of the flap of canvas so you’re left with an equal fold and staple

Finishing Touches
Wedges
Put the canvas material on the back and insert the wedges in each corner as shown below. Use the small hammer to knock these in, don’t over to do. This stretches the canvas to keep the image tight and flat. If you tape on the canvas material in the centre of the canvas, you should be able to feel a drum like effect

Trim Edges
Use a graphics knife to trim the excess of material that remains on the reverse of the frame.
Tape
Use the brown canvas tape to cover the staples and cut of the fabric

Blogs:
There are a series of blogs on offer in relation to printable canvas and canvas making
- Expanding your product range to include Printable Canvas
- Printable Canvas - Everything you need for canvas making #Step1
- Printable Canvas - Preparing artwork for canvas making #Step2
- Printable Canvas - Printing canvas #Step3
How to guide
Expanding your product range to include Printable Canvas with Signmaster has never been more simple. For a simple and comprehensive guide on creating canvases, check out our instructional video on canvas making. Click on the video below to be directed to our YouTube channel and start mastering the art of canvas production.
Always here to help
Feel free to reach out for any additional guidance or assistance. Our dedicated team is eager to lend a helping hand. You can contact us via phone at 01948 804964, shoot us an email at inksandmedia@signmastersystems.co.uk, or simply reach out through our website. We're here to support you every step of the way.
Send us your creations
Decided to add canvas products to your range or have the range already. We would love to see what you create. And with your permission give you a shout out on social media. Send us your pictures via emails at inksandmedia@signmastersystems.co.uk or tag us in your social media.


